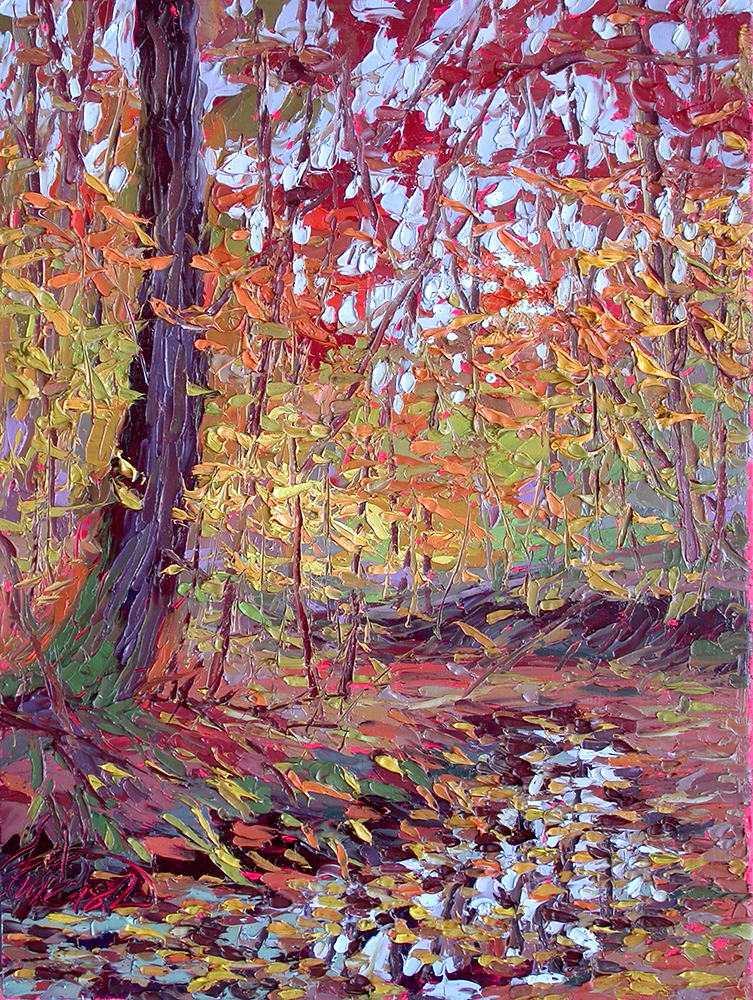
Autumn is super late this year. As late as I have ever seen it. There are still some green leaves in the forest on November 9! Here is the plein air painting I did November 4, 2021. You can see how much more green there is in the forest at this late date.
Lots of gold and orange and rust colored leaves on the trees. Glad the season is running late because so am I!
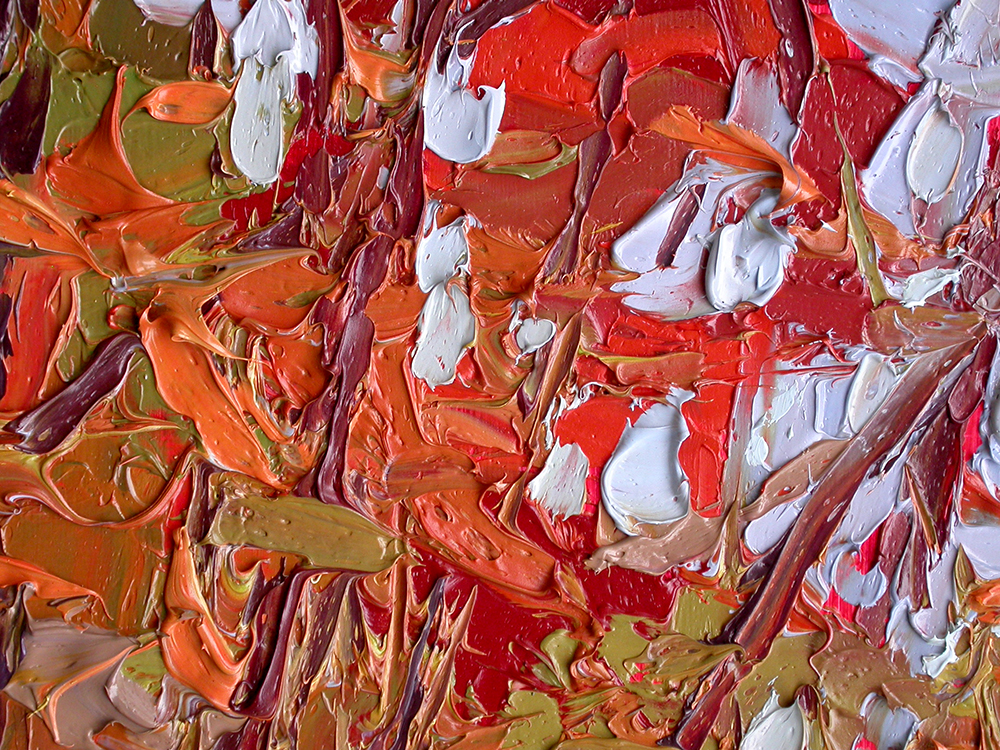
Detail, Late Autumn in Yellowwood, November 9, 2021, plein air oil painting
Gray, overcast day in the mid-60°s. Gray days create a wonderful light in the forest. Ethereal and shimmering.
Detail, plein air oil painting.
I hiked my three mile circuit in Yellowwood State Forest, stopping at the farthest point to set up my tripod, pochade, and paints. Does my pack get heavier every year or what?
More details:
Late Autumn in Yellowwood, November 9, 2021, plein air oil painting.
Lots of energy exudes from the forest and into the paint!
So much rich color from greens to chartreuses to oranges, golds, and rusts. And cool blues and violets.
Detail, plein air oil painting.
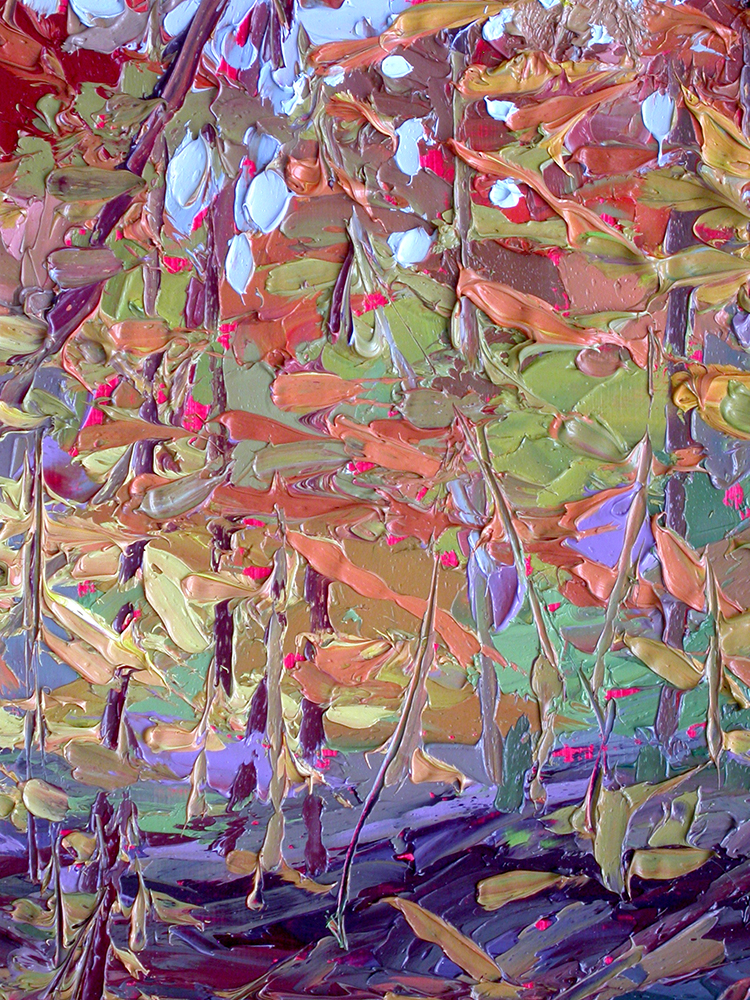
I work back and forth between the foreground, background, middle ground , sky, and creek.
Late Autumn in Yellowwood, November 9, 2021, plein air oil painting.
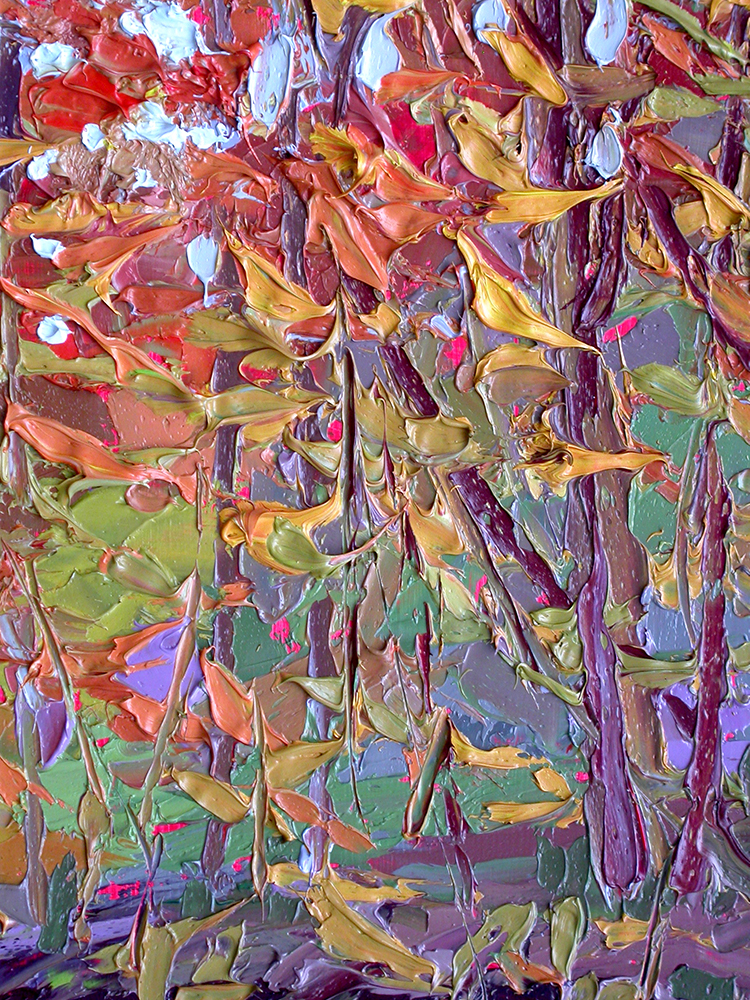
Trees are painted in and then over and pushed back. Then pulled forward again until there are multiple layers of depth with the leaves and trees.
Detail, November 9, 2021, plein air oil painting.
Some of the leaves are rich golds and oranges.
Detail, November 9, 2021, plein air oil painting.
Other parts of the painting are cool and restive.
Late Autumn in Yellowwood, November 9, 2021, plein air oil painting.
Detail of the signature in the wet paint:
Detail of the signature in the wet paint, Late Autumn in Yellowwood, November 9, 2021, plein air oil painting
This time I packed the wet painting in a Raymar box instead of the other carrier I had that doesn’t protect it quite as well. Check out last week’s blog for the story on that. Not to mention, I had to do some repairs on the other carrier.
When I get back to the studio, I usually wait a few hours before pulling the painting out of the carrying box so I can see it with “fresh eyes”. Then I write my field notes on the back of the painting.
Gray, overcast, mid-60°s, Tommy stayed with me, Jack explored the forest but was at the back gate when I got there. 1:30-4:30 p.m.. Cools down. Yellowwood State Forest, Brown County, Indiana. Plein air oil. “Late Autumn in Yellowwood, November 9, 2021.”
Mark your calendar! The 2021 Christmas Art Launch Is Coming Soon!!
I will be getting the Christmas Art Launch ready soon so keep an eye out for more news on that in the next 2-3 weeks. The tentative dates are December 6-8, 2021. Original oil paintings in a variety of sizes as well as prints on canvas will be specially priced just for my VIPs. I’ll have some new releases and surprises, too.
This event is exclusively for my VIPs.
There will also be a selection of fine gift items like artistic mugs and tee shirts. Yoga mats, leggings, rash guard shirts, and swimsuits over on my Charlene Marsh Designs website will be included, too. At least, that’s the plan. I’m probably going to need some help from Santa’s elves to get it all done in time, along with some other deadlines I have.
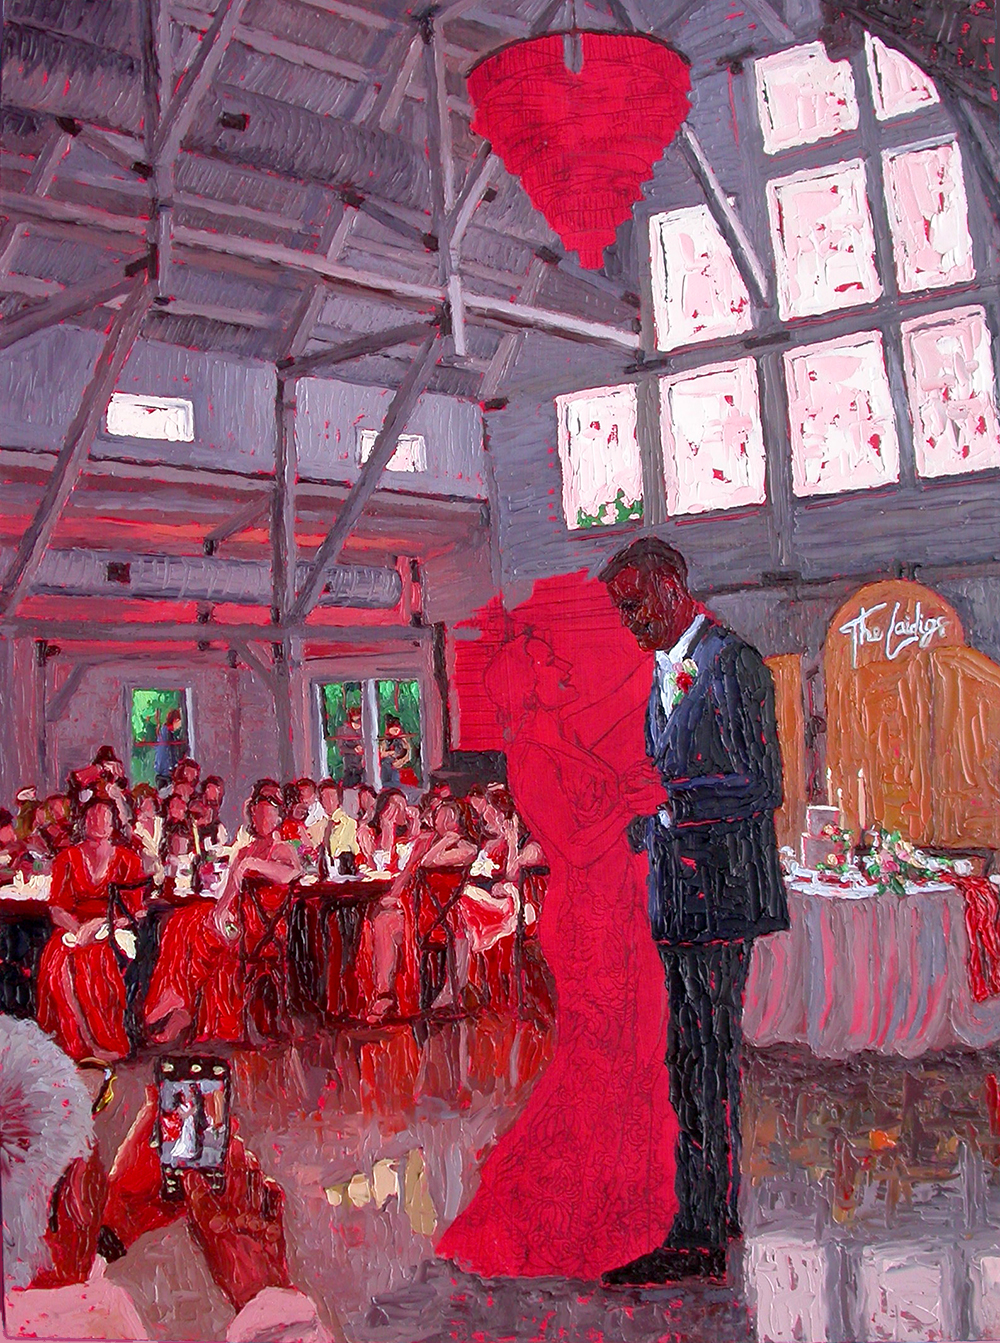
This week, we are finishing Caleb and Jessica’s “First Dance” wedding painting. You can see the Live Wedding Sketches, Part 1, and Part 2 to see the inspiration, design, and progress of the painting.
All that is left is the chandelier and the bride. These elements are the highlights of the painting and I have been looking forward to getting to this point.
Video
Here is a short video showing the evolution of the painting from start to finish:
If watching videos is not your thing, scroll down to see the step-by-step pictures.
The Chandelier
Painting the Chandelier, Caleb and Jessica’s First Dance
The chandelier in the beautiful Sixpence venue, is painted in warm shades of red, orange, and gold that sparkle against the complementary blue greys. If you look carefully, the lights in the chandelier form the hint of a heart over the newlyweds.
Painting the Bride’s Hands and Face
Caleb and Jessica’s First Dance
Next, I paint the bride’s face, arms, and hands.
The Negative Space Around the Bride’s Head
Caleb and Jessica’s First Dance
Painting the negative space helps define the bride’s face and expression. I used a bright green to pop out the face. Later, I will adjust the color, as needed.
At this point, I am ready to paint the bridal gown. Usually, I paint the basic values of the fabric and then add the lace, brocade, or any pattern. I wanted to experiment with seeing how it would compare to paint the gown the way I normally approach it versus painting the pattern first, then the negative space around the lace patterns.
Painting Brocade Experiments
Painting brocade sample 1.
Using my small panel painting easel, I made a quick, 8″ x 6″ sample. In sample 1, I started with painting the fabric and then added the patterns on top.
Painting brocade sample 2.
In sample 2, I painted the fabric in the shadow area and painted the pattern first on the lighter areas. Then painted the negative space around the pattern.
While both samples were successful, I felt I had more control over the under layer of fabric that sets the tone for the highlights and shadows in sample 1. This is the method I normally use and so I went with this way of working. But I was happy to do this little experiment to confirm which method works best for me and what I want to achieve.
Bride’s Gown and Final Tweaks
Caleb and Jessica’s First Dance Final
First Dance FINAL
Once I painted in the bride’s gown, the painting really came together. I worked on the highlights in the negative space wrapping around the bride’s head and highlighting her arm to create a dramatic, eye catching focal point tying in with the backlit highlight on her gown.
At this point, I was able to step back and see what else might need some adjustment.
I toned down the warm colors on the back, left wall so it would recede. I also painted the negative space between the bride and groom, eliminating any elements that would get between the couple. In my photo collage, prepared in Adobe Photoshop, there was some equipment and a man’s head in between the couple. That would NOT do at all in the painting!
The passionate red represents the pure energy between the newlyweds. I also reworked the groom’s head. Normally, I sign the painting in the wet paint in the lower left but forgot to add it when the paint was wet. So, I added some wet paint to the collar of the man recording on his cell phone and added my signature.
Love Love Love
Maybe I am biased, but I LOVE this painting! Please let me know what you think.
If you want me to create a wedding painting for you or a loved one, visit my Wedding Paintings page to learn more. I can’t wait to get started on the next one.
But for now, it is time to get out in the woods to paint en plein air. Luckily, we are having a late fall and the colors are just now peaking.
Thanks so much for following along. I really appreciate your support!
Happy trails,
Charlene
P.S. If you would like to learn more about having a wedding painting created for yourself or a loved one, please visit the Wedding Paintings page on my website. Feel free to call or email me with any questions. Thanks!
Caleb and Jessica's First Dance wedding painting VIDEO.
Time lapse video shows, step-by-step, the creation of this wedding painting from start to finish.
To learn more about creating a special wedding painting for you or a loved one please visit my Wedding Paintings page.
So, let’s start where we left off last time. I was just getting ready to paint the man in the lower left holding a cell phone, recording the “First Dance”.
Man with a cell phone, Caleb and Jessica’s First Dance Part 2
So, here he is recording the “first dance” and we get a painting within a painting.
Backdrop and Wedding Cake
Wedding cake and backdrop
Next, I paint the backdrop with the couple’s names lit up in neon. At the same time, I paint the wedding cake and bridal table.
I ended up reworking the table cloth and cake and may re-work them again. Still debating about that. I’ll wait and see how it looks when I have more of the painting blocked in.
Reworked Wedding Cake and Tablecloth
I also added the hardware to the rafters and beams and started to paint around the windows. Greys are mixed using mostly the Ultramarine Blue and Cadmium Red Medium and Light. The combination of complementary colors yields lovely, ethereal grays that range from warm red-grays to cooler blue-greys. At this point, because of the red tinted panel, the greys look really blue but once the whole painting is blocked in, they will read more grey.
The windows behind the guests and bridesmaids, with some green foliage, are added, too.
There are more details in the drawing than I need or want in the final painting but it helps to give me the “bones” of the painting so I can carve out the scene with the paint and the palette knife aligned with the details. I don’t need to expressly paint the details. How the the thick paint is applied will suggest them.
Painting the Negative Space Around the Windows
Painting the Negative Space Around the Windows, “First Dance” wedding painting.
I start with the walls around the windows which are a darker value than the glass and sky outside. Mixing a cool grey using Ultramarine Blue, Cadmium Red Medium and Light, and Titanium White, I begin to block in the walls. I adjusted the hues to a lighter value. While the walls are dark against the glass, I did not want them to be too heavy handed dark. Once I block in the areas, I can always readjust the values and hues again.
Painting the Rafters
Painting the Rafters, Caleb and Jessica’s First Dance, Part 2
Still using the Ultramarine Blue, Cadmium Red Medium and Light, and Titanium White mix, I continue on painting the rafters in the upper left. Now the painting is really starting to come together. Up to now, the pre-tinted red on the panel has dominated. In fact, I bet some of you were thinking, “This is terrible! What the heck is she thinking?” LOL.
I remember once painting a flowering red bud tree, on location near Owl Creek, at the edge of the road where cars passing by could see the painting. I was just finishing up and putting the final touches on the painting when a car stopped. The driver leaned out the window and said, “That looks pretty good. I drove by when you were starting and it looked like a big mess. You really pulled it together.” I got a good chuckle out of that. I guess making a painting is a bit like making sausage. You really don’t want to see the process! LOL.
Continuing with the Back Wall Behind the Bridesmaids and Guests
Painting the Background
Adding a bit more warm reds and oranges to the grey, I block in the lower part of the rafters and back wall.
The Windows
Painting the Windows.
The windows are one of the lightest, brightest parts of the painting with all that light pouring in. Using Titanium White and a touch of Cadmium Red Medium and Cadmium Red Light, I mix a bright, warm hue for the windows.
The Floor
Painting the Floor. Caleb and Jessica’s First Dance Painting, Part 2
I actually painted the floor once before. Except for the reflection of the bridesmaids, I didn’t like it. So, I scrapped it off and painted it again. This time I was happy with the results.
So, that’s it for now.
Next time I will finish up with the chandelier and the bride. While the bride is the star of the painting, the chandelier is the maid of honor(sorry groom, I am thinking in terms of the composition and sparkling eye candy). Everything up to now has been painted to support the “stars”. Once the chandelier and bride are done, I can step back and see if any others values or hues need to be adjusted.
This is where it gets really exciting to see the painting all come together. Be sure to tune in next time to see how it turns out. Will be so nice to finally have everything blocked in and the red tinted panel covered.
Thanks for following along!
Happy trails,
Charlene
P.S. If you would like a wedding painting for yourself or a loved one, please visit the Wedding Paintings page on my website.
I’ll confess, I am a little behind on this painting. I had to take a week off to install a radio wire e-fence on my 5.5 acres to contain my foxhound who began digging under my regular fence. No sooner would I plug a hole than he would dig a new one. Foxhounds are bred to run for miles and miles and miles with horses and this guy would be gone anywhere from 15 hours to three days. Sometimes he would come home on his own and sometimes I would get a call from someone. Last time, I picked him up more than eleven miles away! Poor guy is an 18th century dog living in the wrong century.
Immediate Action Was Required!
Even so, it took me a week to read the 26 page instruction book, cover to cover, learn how to twist 36′ of wire, thread wire through tubing, clear multiflora roses off of 2300′ of fence line, lay and splice the wire, and test it out with the transmitter. Only to find I didn’t have a closed circuit loop. Grrrr…back to the drawing board.
Trial and Error
I won’t go into all the machinations, but it took another two weeks to solve the issues, test the system, attach to the existing fence, set the flags, and train my dog. So far, keeping my fingers crossed, my foxhound is contained on the property except for our daily hike in the forest when he is wearing a different e-collar so I can beep him back to me.
If anyone needs help with a radio wire e-fence, give me a call!
October Open House
In the meantime, I also had the October Open House to get ready for which included ripping out some shelves in the gallery, stacking and cleaning a huge pile of tapestries, mowing and weed whipping, prepping some refreshments, decorating, and setting up my display tent with artwork. Not to mention varnishing and framing new paintings.
Whew! Glad to be back to the wedding painting!
Planning the composition is key to the very foundation and ultimate success of the painting. There are so many fabulous options and directions to go, that narrowing it down can be tough! So, I stewed over the various options until I realized I kept coming back to one.
The color scheme of the painting is another top consideration. A palette using blues and oranges and all the mixed grays would be perfect for this painting.
I finalized the composition that includes the couple, the cake, backdrop, bridesmaids and guests, and the venue with the fabulous chandelier.
Adobe Photoshop
I used Adobe Photoshop to layer about 40 different photos. Rearranging key elements and increasing and decreasing the sizes and, ultimately, rejecting and hiding many layers of elements that didn’t work as well as others. I spent several days on the composition to get it just right.
Caleb and Jessica’s First Dance, photo sketch 1.
This is the first printed version of the final composition. On the computer screen, which is backlit, it looked great. But, when printed, it is a tad too dark for certain elements. In particular, the ceiling and rafters are too dark in the upper left.
Caleb and Jessica’s First Dance, photo sketch 2.
So, I drastically lightened it in Photoshop and re-printed it. Both versions help me remember key elements and the value relationships I want to capture in the painting. You can see that the name on the backdrop is too light in this lightened version. Obviously, these collages of the composition are just “sketches” with lots of decisions still to be made. But they give me a good jumping off point.
Once I settled on the composition, it was transferred to the pre-tinted panel, carefully drawing it all out. After the composition was drawn on the panel, I spent more time refining and tweaking it before I started painting. Easier to build a house on a solid foundation than to try and go back and redo the foundation after the house is built.
Painting the Groom
Painting the groom.
So, now I am ready to start the painting. Using palette knives to keep the painting loose and chunky and vibrant while still capturing lots of details, I start by applying the black hues and values. The groom’s tuxedo is the most prominent black value — actually, a dark blue — so I start there. Using a mix of Ultramarine Blue and Cadmium Red Medium, I mix a deep black for his suit. For the lighter areas, I add a touch of white to the predominantly blue mixture.
Bridesmaids’ Table
The Bridesmaids’ Table.
Then I move to the bridesmaids’ table. Their gowns are a rust orange that perfectly conveys the autumn wedding theme. Again, I start with the darkest values. Mixing a black using more of the Cadmium Red Medium than the Ultramarine Blue, I paint in the darkest hues. Orange hues are mixed with Cadmium Red Light and Medium with a touch of Ultramarine Blue.
Painting the Bridesmaids.
Seems to work best on the wedding paintings to paint a section at a time. So, next, I carve out the bridesmaids and other guests. Mixing a rusty orange using Cadmium Red Light and Medium, Cadmium Yellow Light, Magenta Red and a bit of Ultramarine Blue, I paint the bridesmaids dresses. For the tabletop, glassware, and other décor I use combos of Titanium White and yellow, red, and violet.
If you make it out to Brown County during this gorgeous fall, please stop by for a visit to the gallery. Just give a me call on the studio/gallery line(sorry, poor cell service out here), 812-988-4497, or shoot me an email, Char@CharleneMarsh.com, and let me know when you are coming.







 Please let me know what you think.