
I recently got this email from a subscriber:
Hi, Charlene,
I have been
receiving your emails and following your work since December, I believe.
I am just fascinated with your heavy impasto style. Your work is so
intricate that I doubt you will ever have to fear your works will be
forged. Ha!
While I
understand that a lot of painters choose to underpaint their surface in a
mid-tone, can you explain why you choose to use red as an underpainting in your
landscapes?
Also, please
tell which you like to work with better as a surface: the solid wood or
stretched canvas.
Thanks for
sharing your paintings and your expertise. I really enjoy it.
Carolyn (Private Hidden)
Hi,
Carolyn~
Thanks
for your email. Glad you enjoy following my paintings! I figure if you are asking these questions, other people might be as well so I will post this to my blog.
Despite the brilliant, intense, red color, it is a middle value. I want a color that is a middle value so that when I put down a dark, it is relative to the middle value of the tinted panel. And when I put down a light mark, it is actually light against the tinted base. If I start with a white base, any color put down on white will automatically be darker than that. So the crimson tint works as that middle value while blocking in the painting.

I have found the red color just works well with the four season, forest paintings I like to do. As the complementary color to green, the little flecks of red that show through, sparkle and vibrate with the green paint of the foliage, adding a certain visual electricity to the painting.

In winter, the red sparkles against the cool blues adding a bit of warmth. People often "see" cardinals in the trees as a result. In the fall, the reds blend in with the fall foliage and keep bits of white support from showing through and being visually distracting. And the fresh spring greens look lovely against the red as well.
As for wood panels versus stretched canvas, I
prefer the wood panel supports over stretched canvas, especially
painting with the palette knives. The canvas has more "give" than the
wood panels. The panels provide a good solid support for the knife work
and heavy impasto paint.
I also have experimented with canvas attached to wood but found the resulting surface has too much "drag" for my liking. I love the fast, slick surface of the wood panels with the dynamics of the palette knives!
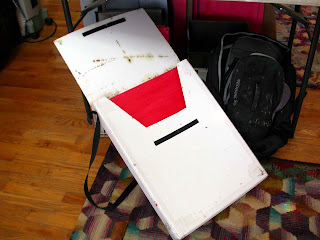
The panels also work well for the plein air painting and fit easily in the various wet panel carrying boxes. You can read my BLOG HERE about the wet panel carriers.
Having
said that, I decided to try the stretched canvas again - it's been a
few years since I've used it! I wanted to try a diptych (see my blog here PART 1 and PART 2) on the thick
stretcher bars with the canvas wrapped edges so that the finished
painting would not need to be framed. And the two canvases could hang
side by side and work, visually. Surprisingly, I enjoyed working with
the stretched canvas more than I thought I would and will have to do more.
 The
reason I wanted to do a painting that did not need to be framed is
because my frame suppliers have really let me down the past year(out of
stock, changed the finish, limited frame sizes, etc.) and, despite a
concentrated search for replacements, I have still not settled on a good solution.
The
reason I wanted to do a painting that did not need to be framed is
because my frame suppliers have really let me down the past year(out of
stock, changed the finish, limited frame sizes, etc.) and, despite a
concentrated search for replacements, I have still not settled on a good solution.
People
all have different ideas about what kind of frame they want so I try to
select a stock frame(s) that works for both contemporary and
traditional tastes, preferably both a light and a dark option, and works well with most of my paintings. Keep it
simple. Quite a tall order! Here is my BLOG WITH A LIST OF FRAME SUPPLIERS that might be helpful for both the collector and the artist.
To
hang and present the paintings on the panels, they MUST be framed. I
cannot attach the hanging hardware to the panel - the hardware must attach to the
frame. I could glue a wood strip on the back of the panel and attach
the hardware to that. But, in the end, I just think that the panels -
and paintings - look much better with a frame.
Saying
that, I was very pleased with the end result of the stretched, canvas
wrapped supports and like them without a frame. I just need to paint
them far enough in advance that they will be bone dry by the time they
need to go to a show and then wrapped carefully to protect the thick paint.
In the end, I think an artist needs to experiment with various supplies and equipment and find what he or she prefers, what best transmits his or her unique "voice".
So, I hope that answers your questions, Carolyn! Thanks for asking!
Happy Trails!
Charlene


